
vuex的原理是什么?

在vuex中,我们将从一些概念开始。
这取决于vuex的工作流程。

修改state的唯一方法是提交mutations。
在异步情况下派发(dispatch)动作,其本质仍然是提交mutations。
在提交mutations之后,VueComponents可以动态呈现组件。
感觉有没有减少了什么,没错,当getters下实现时就会说。
一、vuex实现
下一步,我们将模拟vuex的源代码实现一个简单版本的vuex。
您可点击此处查看完整的源码,并随文章观看。
二、建立存储库
第一,我们需要创建一个store,该store有下列属性和方法。
将createStore方法定义为简单的创建一个Store实例并传递options。
扩展函数创建存储(options){returnnewStore(options)}
让我们看一下Store类的实现。
收集 modules
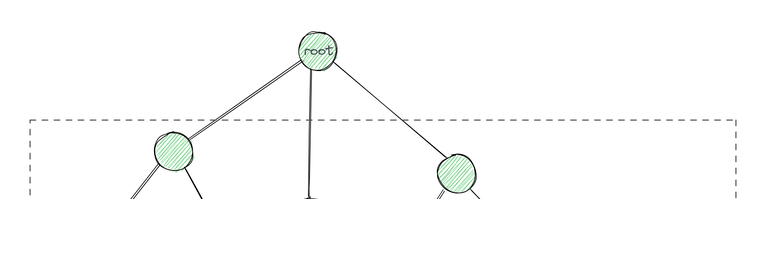
通过ModuleCollection收集 modules,生成一棵 module 树
// store.js export class Store { constructor(options = {}) { this._modules = new ModuleCollection(options) } } // module-collection.js export default class ModuleCollection { constructor(rawRootModule) { this.register([], rawRootModule) } register(path, rawModule) {} }在ModuleCollection中调用了一个注册函数register来注册每个 module
其中path参数指的是当前 moduel 的路劲,可以用来判断层级关系,rawModule则是原始的 module 对象
register(path, rawModule) { const newModule = new Module(rawModule) if (path.length === 0) { // root 定义为 rawModule this.root = newModule } else { const parent = this.get(path.slice(0, -1)) parent.addChild(path[path.length - 1], newModule) } // 如果传入有 modules,递归地注册子模块 if (rawModule.modules) { Object.keys(rawModule.modules).forEach(key => { const rawChildModule = rawModule.modules[key] this.register(path.concat(key), rawChildModule) }) } }在register中,通过rawModule我们实例化了一个Module对象,它具有以下属性
-
_rawModule:传入的原对象
-
_children:子 moduels
-
state:传入的原对象的 state 值
-
getChild:获取子 moduel 的方法
-
addChild:新增子 module 的方法
当path.length === 0时,将该newModule作为root的值,也可以叫做父 module
设置完root后,会继续判断有没有modules,如果有的话,递归地注册子模块
// 如果传入有 modules,递归地注册子模块 if (rawModule.modules) { Object.keys(rawModule.modules).forEach(key => { const rawChildModule = rawModule.modules[key] this.register(path.concat(key), rawChildModule) }) }在这里,将每个 module 各自的 key 设置为 path 用来区分层次,加入到root中
get(path) { return path.reduce((module, key) => { return module.getChild(key) }, this.root) } if (path.length === 0) { // ... } else { const parent = this.get(path.slice(0, -1)) parent.addChild(path[path.length - 1], newModule) }最后,我们就得到了这样的一个 module 树

绑定 commit 和 dispatch
继续回到 store 的构造函数代码
// 绑定 commit 和 dispatch 到自身 const store = this const { dispatch, commit } = this this.dispatch = function boundDispatch(type, payload) { return dispatch.call(store, type, payload) } this.commit = function boundCommit(type, payload) { return commit.call(store, type, payload, options) }封装替换原型中的 dispatch 和 commit 方法,将 this 指向当前 store 对象。dispatch 和 commit 方法具体实现如下:
commit(type, payload) { const mutation = { type, payload } const entry = this._mutations[type] if (!entry) { return } entry(payload) this._subscribers.slice().forEach(sub => sub(mutation, this.state)) }刚开始我们就提到,修改 state 需要提交 mutation,commit就实现了这一过程
dispath和commit的作用相同,不同的是dispath是派发action来提交mutation修改state,我们通常在action中执行异步函数
dispatch(type, payload) { const action = { type, payload } const entry = this._actions[type] if (!entry) { return } try { this._actionSubscribers .slice() .filter(sub => sub.before) .forEach(sub => sub.before(action, this.state)) } catch (error) { console.error(e) } const result = entry(payload) return new Promise((resolve, reject) => { result .then(res => { try { this._actionSubscribers .filter(sub => sub.after) .forEach(sub => sub.after(action, this.state)) } catch (error) { console.error(e) } resolve(res) }) .catch(error => { try { this._actionSubscribers .filter(sub => sub.error) .forEach(sub => sub.error(action, this.state, error)) } catch (e) { console.error(e) } reject(error) }) }) }在commit和dispath中,都执行了各自的订阅函数集合_subscribers和_actionSubscribers,
_subscribers的订阅函数中传入了当前的 mutation 对象和当前的 state,这是提供给插件的参数
_actionSubscribers还将函数分为了before,after,error类型
module 安装
module 的安装是为了封装 mutations、actions、getters 函数,传入需要的参数
封装 mutation
if (module._rawModule.mutations) { Object.keys(module._rawModule.mutations).forEach(key => { const mutation = module._rawModule.mutations[key] store._mutations[key] = payload => // 惰性获取 state mutation.call(store, getNestedState(store.state, path), payload) }) }封装 action
if (module._rawModule.actions) { Object.keys(module._rawModule.actions).forEach(key => { const action = module._rawModule.actions[key] store._actions[key] = payload => { let res = action.call( store, { dispatch: store.dispatch, commit: store.commit, getters: store.getters, state: getNestedState(store.state, path), }, payload ) if (!(res instanceof Promise)) { res = Promise.resolve(res) } return res } }) }封装 getter
if (module._rawModule.getters) { Object.keys(module._rawModule.getters).forEach(key => { const getter = module._rawModule.getters[key] store.getters[key] = () => // 惰性获取 state getter(getNestedState(store.state, path), store.getters) }) }最后递归安装子 module
Object.keys(module._children).forEach(key => installModule(store, rootState, path.concat(key), module._children[key]) )需要注意的一点是,获取 state 的时候需要惰性的获取,因为在使用 vuex 的过程中,state 发生会改变,如果封装函数的时候固定 state,会有不符合预期的行为
初始化 state
然后是resetStoreState函数
export function resetStoreState(store, state) { store._state = reactive({ data: state, }) }将state变为响应式的,这样就可以在 vuex 修改了 state 之后,更新视图了
关于 vue3 的数据响应式原理可以看我的这篇文章 vue3 数据响应式原理分析
看到这你可能会有点迷惑,怎么实例上的是_state而不是state呢?其实还有store中还有一个 getter 取 state 的值
get state() { return this._state.data } set state(v) {}这里我们也可以发现,直接设置 state 的值是无效的
应用插件
我们先来实现一个打印修改 state 前后变化的插件:logger
export const logger = store => { let prevState = deepClone(store.state) store.subscribe((mutation, state) => { const nextState = deepClone(state) const formattedTime = getFormattedTime() const message = `${mutation.type}${formattedTime}` console.log('%c prev state', 'color: #9E9E9E; font-weight: bold', prevState) console.log('%c mutation', 'color: #03A9F4; font-weight: bold', message) console.log('%c next state', 'color: #4CAF50; font-weight: bold', nextState) prevState = nextState }) }很简单,监听一下mutation就可以啦
store中会注入每个插件
plugins.forEach(plugin => plugin(this)实验一下效果,如果你 clone 了源码,那么你可以在安装了依赖之后,执行
yarn dev打开控制台,来查看效果

相关文章:
相关推荐: